#1 JBE series 3 restoration. Next on the list....
Posted: Mon Sep 11, 2017 6:43 pm
Ok. Next on the list to restore is my much loved JBE series 3 direct drive.
I have had this deck since 01/02/10, the reason I know the date is because I received it the same day as son number 2 was born, just after we got back from the hospital with him. Hence I have an emotional attachment to it.
I sold it once, parcel force smashed it, I got the remains back. I then had to refund the buyer and got nothing from parcel force who weaseled out of paying the compensation.
The damage was extensive, all 4 of the micro seiki microsorber feet were smashed beyond repair, so was the lid, the acrylic psu box was stove in on the top and the arm board was smashed off.
I managed to get it running again by making a new arm mount, attaching a set of 3 apple wood turned legs that were on the Lenco that I bought off Richard Higgins (that ended up as the first lenco conversion), popping out the acrylic top on the psu box (its still badly cracked but is at least it is flat), replacing a smashed fuse holder, the red power led that ended up detached, and the linear pot for the 45rpm speed adjustment control.
This was all done as a rush job just to get it back up and running, so it has stayed in a state, and most recently has been collecting dust on top of a wardrobe since I completed the Lenco demonstrator.
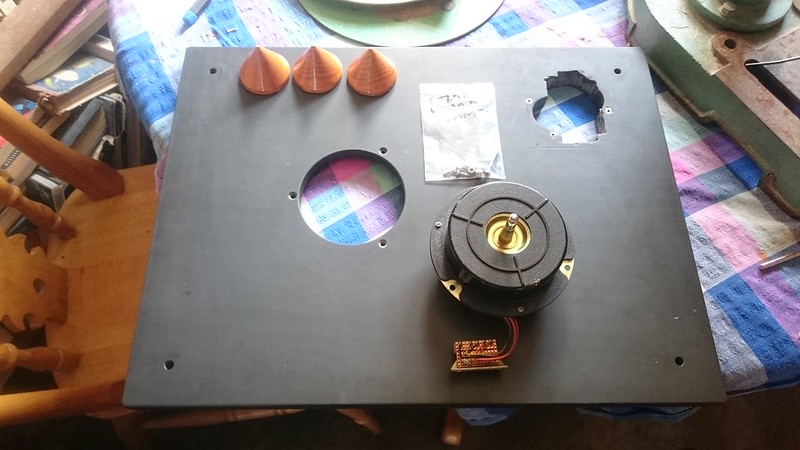
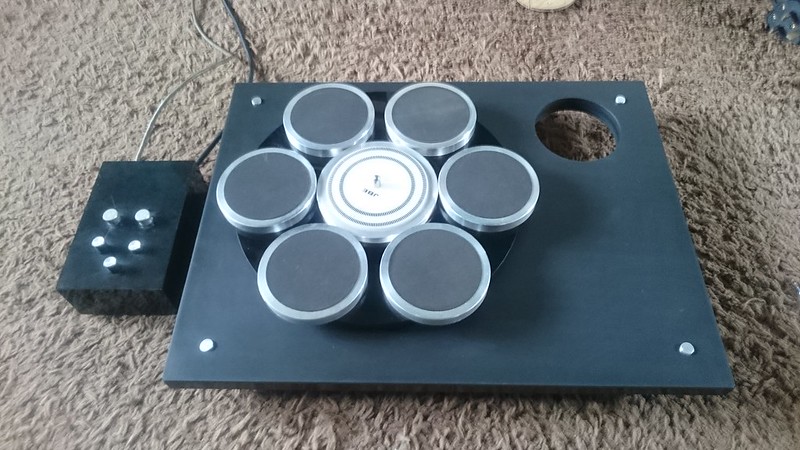
Whoever had it before me had not looked after it, and had done a number on the arm cutout which was originally for an sme 3009. These came from the factory specced to accept either the sme or with a wider plinth to accept a dynavector dv505. Which would be awesome. I want one. If you wanted something else, you could have a special order, but Ive never seen one with anything other than an sme cutout.
This is what I'm working with
 Jbe series 3 by anthony cresswell, on Flickr
And this time i'll be doing it properly.
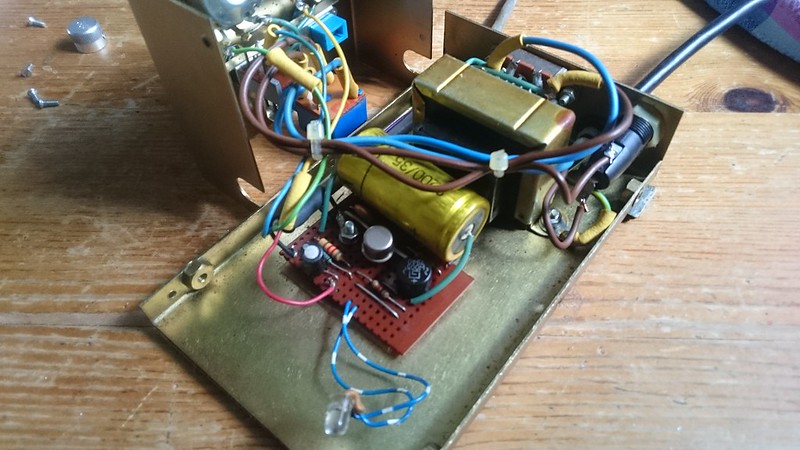
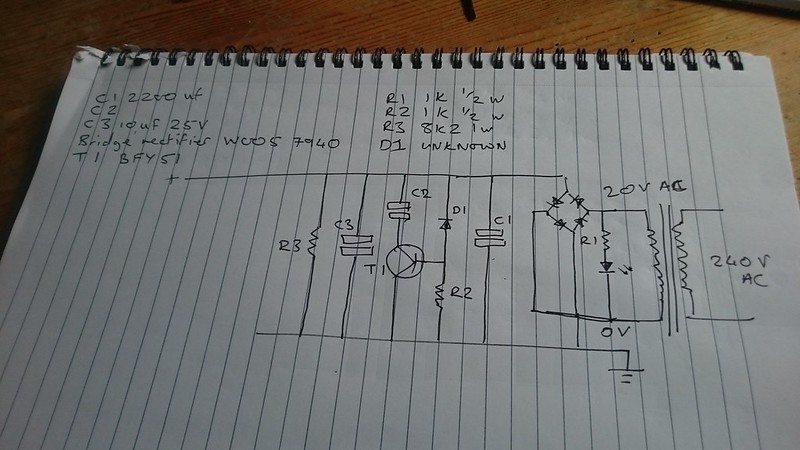
I have serviced the motor already, I did that after taking it to Simons to compare with his Ekos armed Lenco and the old mans Mayware armed Lenco, so thats sorted. The power supply has already been sorted, although I'm going to check it over again as one of the caps looked abit suspect last time I looked at it.
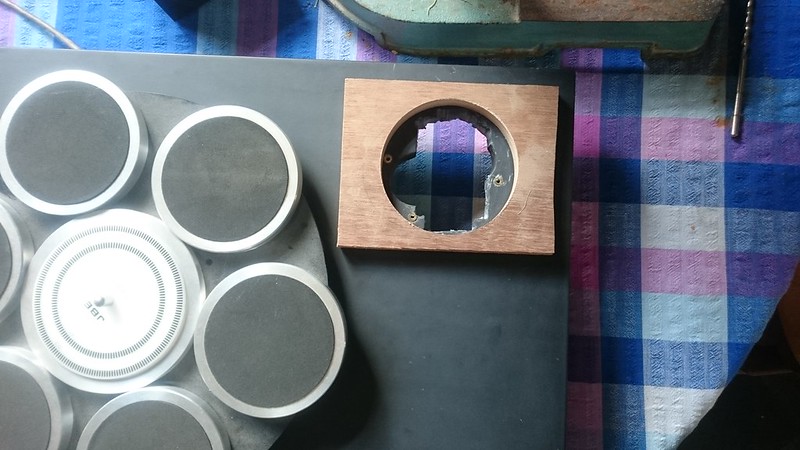
The plan is to put the 85mm diamond holesaw you can see in the picture, wot I bought just for this job, through the plinth to cut out the mess where the arm goes, and leave me with a proper hole that I can turn a proper arm board to fit in. I'll have to figure out how to get a water feed around the area to keep the holesaw cool and keep the dust down. I have a drill stand i can use with a my 110v drill and site transformer, and have a collar that fits around the drill neck that I can rig a splash guard to. I'll string the power cables up high and away from the water. Second, to remove the awful block connector from the psu cable and deck and fit a proper locking connector similar (but larger and specced for power) to the one I've used on the arm cables on the CX unipivots. Third to make a new set of 4 taller legs to replace the 3 cones that are on it at the moment that will use the original mounting holes, and fourth, to make a new acrylic housing for the psu. Doc I might pick your brains on this part on the best way to do it.
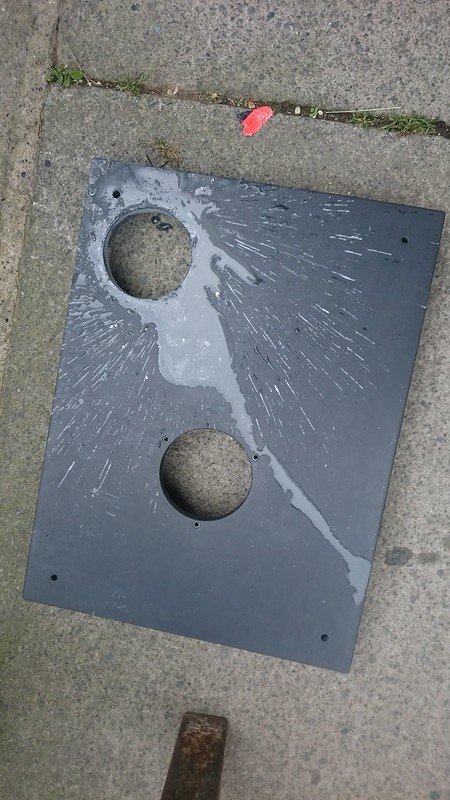
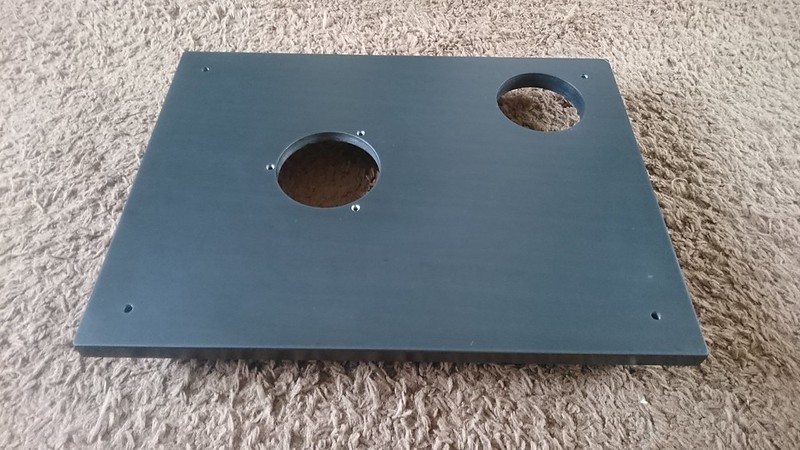
Lastly, I'll be refinishing the slate plinth to remove all the dints dents and scratches it has suffered over the years of neglect. I may also drill through the plinth so that the new arm board which will have a flange around the top edge can be bolted down, but that depends on how the board goes. The board and the legs will be made out of the same material to make it look as factory as i can. Ideally, I'd like to make the legs and board from black acrylic as the platter is a combination of a black acrylic disc and the aluminium discs, and obviously the psu box is also black acrylic; perhaps an oak plug that fits in the arm board hole and a 3mm black acrylic piece glued on top to form the surface that is seen and the mounting flange. Im sure I can get black acrylic rods cut to length for the legs.
We shall see.
I have had this deck since 01/02/10, the reason I know the date is because I received it the same day as son number 2 was born, just after we got back from the hospital with him. Hence I have an emotional attachment to it.
I sold it once, parcel force smashed it, I got the remains back. I then had to refund the buyer and got nothing from parcel force who weaseled out of paying the compensation.
The damage was extensive, all 4 of the micro seiki microsorber feet were smashed beyond repair, so was the lid, the acrylic psu box was stove in on the top and the arm board was smashed off.
I managed to get it running again by making a new arm mount, attaching a set of 3 apple wood turned legs that were on the Lenco that I bought off Richard Higgins (that ended up as the first lenco conversion), popping out the acrylic top on the psu box (its still badly cracked but is at least it is flat), replacing a smashed fuse holder, the red power led that ended up detached, and the linear pot for the 45rpm speed adjustment control.
This was all done as a rush job just to get it back up and running, so it has stayed in a state, and most recently has been collecting dust on top of a wardrobe since I completed the Lenco demonstrator.
Whoever had it before me had not looked after it, and had done a number on the arm cutout which was originally for an sme 3009. These came from the factory specced to accept either the sme or with a wider plinth to accept a dynavector dv505. Which would be awesome. I want one. If you wanted something else, you could have a special order, but Ive never seen one with anything other than an sme cutout.
This is what I'm working with
Jbe series 3 by anthony cresswell, on FlickrAnd this time i'll be doing it properly.
I have serviced the motor already, I did that after taking it to Simons to compare with his Ekos armed Lenco and the old mans Mayware armed Lenco, so thats sorted. The power supply has already been sorted, although I'm going to check it over again as one of the caps looked abit suspect last time I looked at it.
The plan is to put the 85mm diamond holesaw you can see in the picture, wot I bought just for this job, through the plinth to cut out the mess where the arm goes, and leave me with a proper hole that I can turn a proper arm board to fit in. I'll have to figure out how to get a water feed around the area to keep the holesaw cool and keep the dust down. I have a drill stand i can use with a my 110v drill and site transformer, and have a collar that fits around the drill neck that I can rig a splash guard to. I'll string the power cables up high and away from the water. Second, to remove the awful block connector from the psu cable and deck and fit a proper locking connector similar (but larger and specced for power) to the one I've used on the arm cables on the CX unipivots. Third to make a new set of 4 taller legs to replace the 3 cones that are on it at the moment that will use the original mounting holes, and fourth, to make a new acrylic housing for the psu. Doc I might pick your brains on this part on the best way to do it.
Lastly, I'll be refinishing the slate plinth to remove all the dints dents and scratches it has suffered over the years of neglect. I may also drill through the plinth so that the new arm board which will have a flange around the top edge can be bolted down, but that depends on how the board goes. The board and the legs will be made out of the same material to make it look as factory as i can. Ideally, I'd like to make the legs and board from black acrylic as the platter is a combination of a black acrylic disc and the aluminium discs, and obviously the psu box is also black acrylic; perhaps an oak plug that fits in the arm board hole and a 3mm black acrylic piece glued on top to form the surface that is seen and the mounting flange. Im sure I can get black acrylic rods cut to length for the legs.
We shall see.